Matrix with video calls that don't suck using Continuwuity + LiveKit
·
cenotaph's docs
The first Matrix setup that I would consider a viable Discord replacement
I've had something of a chip on my shoulder about Discord ever since they killed my old TeamSpeak3 server years ago, so I can't say I was too sad when things started to go downhill for them. Despite this, when searching for alternatives I've often found that competitors are lacking in the features that Discord users care about- one of the biggest being larger numbers of simultaneous video calls + screen shares. I have tried Matrix a few times in the past, and each time I've found the group video to be less than satisfactory, both with Jitsi and with Coturn.
Earlier this year however, Matrix and Element introduced MatrixRTC, an implementation of LiveKit that allows for realtime encrypted communication, both over text and video, very much in a similar manner to Discord. It is also impressively lightweight. I did some tests recently in which I was able to have 4 people in a group call all webcam streaming in full quality while 3 of us were simultaneously screensharing. When looking at resource usage on the server, you couldn't even see much of a difference at all in terms of CPU/RAM usage when starting the group call.
Here I hope to be able to give you the tools needed to run one for yourself, fully federated and encrypted. This guide is possible in no small part due to the excellent documentation available on the continuwuity website.
Prerequisites
To run a Matrix server that will actually federate and connect to others, you need a few things first:
- A domain name pointing to the IP where your server will be hosted. This can be just a subdomain if necessary.
- A reverse proxy (or similar routing tool like Pangolin or Netbird) that can act as an SSL/TLS endpoint for the server. HTTPS is a requirement for federation between servers
- Ports
443and8448opened in your firewall, the former for traffic between clients and the server and the latter for federation traffic between your server and other Matrix instances - If also hosting voice with livekit, you'll need to also allow
7881/tcpand50100:50200/udp
Because it is what I have the most experience with, I will be primarily speaking in the context of running this through a Pangolin instance (find more on that in my other post here) for our SSL/TLS and reverse proxying needs. For those of you using traditional reverse proxies, I will be periodically linking to the corresponding continuwuity documentation that will show any differences there might be between what you should do and mine. The steps are similar enough, though, that you may be able to follow along well enough without it.
Your Backend
There are a few different options of backend when you are looking to run your own server. The default, maintained by the Matrix organization itself, is Synapse. This is very good, but it can be resource intensive and in my experience is more work to set up. That said, it does still make up the majority of Matrix servers.
Personally, I am partial to the "conduit" family. Conduit and its successor, conduwuit, are both sadly inactive and no longer being maintained, but two successors have emerged from their maintainers: tuwunel and continuwuity. When deciding which of these to go with I found I had stumbled upon a contentious issue.
- tuwunel: The "official" successor, endorsed by the main dev of the conduwuit project. Smaller pool of developers, but does have at least one paid full time developer working on the project.
- continuwuity: Larger number of individual developers, but all volunteers. Features a number of people who were regular contributers to the conduwuit project. It's existence appears to make the developer who runs the tuwunel project quite upset, as they repeat quite often that they are the only official fork of the tuwunel project.
In the end, I ended up deciding on continuwuity as they seemed to be making regular, consistent updates focused on Quality of Life changes and new features. They also seemed to be far less upset about the existence of other forks. I recommend you take a look at the pages linked above and decide for yourself, but I personally (and as follows, this guide) will be operating under the assumption going forward that you are using continuwuity.
The Docker Compose
services:
    homeserver:
        image: "forgejo.ellis.link/continuwuation/continuwuity:latest"
        restart: unless-stopped
        command: /sbin/conduwuit
        ports:

            # If your reverse proxy is on the host, use this
            # and configure it to connect to `127.0.0.1:8008`
            - 127.0.0.1:8008:8008

            # If your reverse proxy is on another machine, use this
            # and configure it to connect to <this-machine-ip>:8008
            # - 8008:8008

        volumes:
            - /path/to/your/continuwuity/data:/var/lib/continuwuity
            - ./continuwuity-resolv.conf:/etc/resolv.conf # use custom resolvers rather than Docker's
            - ./continuwuity.toml:/etc/continuwuity.toml
        environment:
            CONTINUWUITY_CONFIG: '/etc/continuwuity.toml'

    lk-jwt-service:
      image: ghcr.io/element-hq/lk-jwt-service:latest
      container_name: lk-jwt-service
      environment:
        - LIVEKIT_JWT_BIND=:8081
        - LIVEKIT_URL=https://livekit.example.com # your LiveKit domain
        - LIVEKIT_FULL_ACCESS_HOMESERVERS=matrix.example.com # your server_name
        # Replace these with the generated values as described below
        - LIVEKIT_KEY=blahblahsecretkey
        - LIVEKIT_SECRET=blahblahlivekitsecret
      restart: unless-stopped
      ports:
        - "8081:8081"

    livekit:
      image: livekit/livekit-server:latest
      container_name: livekit
      command: --config /etc/livekit.yaml
      restart: unless-stopped
      volumes:
        - /path/to/your/livekit/config:/etc/livekit.yaml:ro
      network_mode: "host" # /!\ LiveKit binds to all addresses by default.
While I've given the whole compose up front as a reference, I'm going to address it piece by piece because I think it makes it a little bit more digestible. As previously stated, you may need to have a slightly different docker compose setup if you are using a local reverse proxy rather than a remote proxy like Pangolin. For example configurations using various local reverse proxies, see the continuwuity documentation here.
Matrix Homeserver
To start, I'll be addressing this chunk:
    homeserver:
        image: "forgejo.ellis.link/continuwuation/continuwuity:latest"
        container_name: homeserver
        restart: unless-stopped
        command: /sbin/conduwuit
        ports:

            # If your reverse proxy is on the host, use this
            # and configure it to connect to `127.0.0.1:8008`
            - 127.0.0.1:8008:8008

            # If your reverse proxy is on another machine, use this
            # and configure it to connect to <this-machine-ip>:8008
            # - 8008:8008

        volumes:
            - /path/to/your/continuwuity/data:/var/lib/continuwuity
            - ./continuwuity-resolv.conf:/etc/resolv.conf # use custom resolvers rather than Docker's
            - ./continuwuity.toml:/etc/continuwuity.toml
        environment:
            CONTINUWUITY_CONFIG: '/etc/continuwuity.toml'
The initial few lines I feel are relatively self explanatory, but just for good measure:
- image: -- Points to the source of the docker image you're using for your homeserver. In my compose, you're using the image from the main continuwuity forgejo instance. There are, however, other mirrors available here.
- container_name: - Is the human-readable name of the container when referred to internally in docker
- restart: unless-stopped - sets the container to auto-restart itself, unless you have manually stopped it
- command: /sbin/conduwuit - is the command the container starts with, required for continuwuity
Then we're next going to set up a few things that we won't get a chance to actually configure until a little later, but things are easier if we do this all now.
-
ports: - how you configure these depends on how you've set up your network configuration:
- If your reverse proxy is on the same machine as the Matrix homeserver will be, then use the same as I have above in the uncommented line,
127.0.0.1:8008:8008. - If your reverse proxy is on the same LAN as the Matrix homeserver but not on the same device, you'll want to use the second, still commented line in my example instead,
8008:8008. - If your reverse proxy is on the same docker network as your homeserver, then you have the additional option of removing the "ports" section altogether and connecting via the docker network. In this case, when connecting to the homeserver, you would use
homeserver:8008as the host (replacing homeserver with whatever you set thecontainer_name:property to be)
- If your reverse proxy is on the same machine as the Matrix homeserver will be, then use the same as I have above in the uncommented line,
-
volumes: - is mounting directories on your real, bare-metal filesystem onto virtual directories that the processes within the docker container can see. Each of the mounts in the compose are necessary, for the reasons below:
- /path/to/your/continuwuity/data:/var/lib/continuwuity - here, on the left side of the colon, you should fill in where you want continuwuity's database to be stored. The right side of the colon is where that directory exists on the docker container side of things, and should not be changed.
- ./continuwuity-resolv.conf:/etc/resolv.conf - this mounts a custom DNS resolver into the container, which is important because Matrix needs to make a LOT of DNS requests for federation, and the standard resolver docker uses is said to not be performant enough to keep up. What we put in this configuration file will be addressed later, for now just set on the left side of the colon where you want to store the configuration file. If left as written it will look for the file in the same directory as the docker-compose.yml. Configuration recommendations for this file can be found in the Networking/DNS section farther down in this guide.
- ./continuwuity.toml:/etc/continuwuity.toml - the left side of the colon sets where to look for the continuwuity config file on the bare metal file system. If left as is, it will look for it in the same directory as the docker-compose.yml. We'll get into filling this out in the "configuration" section later on.
-
environment: - While many of the settings for continuwuity can be set using environment variables, I was unable to find a comprehensive list of them anywhere, and some of the config values that need to be set for livekit are just easier to do in the .toml file. For that reason, the only ENV var that needs to be set is
CONTINUWUITY_CONFIG: '/etc/continuwuity.toml'
LiveKit
    lk-jwt-service:
      image: ghcr.io/element-hq/lk-jwt-service:latest
      container_name: lk-jwt-service
      environment:
        - LIVEKIT_JWT_BIND=:8081
        - LIVEKIT_URL=https://livekit.example.com # your LiveKit domain
        - LIVEKIT_FULL_ACCESS_HOMESERVERS=matrix.example.com # your server_name
        # Replace these with the generated values as described below
        - LIVEKIT_KEY=blahblahsecretkey
        - LIVEKIT_SECRET=blahblahlivekitsecret
      restart: unless-stopped
      ports:
        - "8081:8081"

    livekit:
      image: livekit/livekit-server:latest
      container_name: livekit
      command: --config /etc/livekit.yaml
      restart: unless-stopped
      volumes:
        - /path/to/your/livekit/config:/etc/livekit.yaml:ro
      network_mode: "host" # /!\ LiveKit binds to all addresses by default.
In this section of the compose, we have two different co-dependent containers. The lk-jwt-service container is the authentication service that interfaces with continuwuity/matrix in order to facilitate our e2ee realtime communications. The livekit conainer contains the actual livekit service itself.
The images and container lines should at this point be self-explanatory (and if you're confused refer back to my explanation of the properties of the continuwuity container., so I'll start right into the environment variables for the lk-jwt-service container.
- LIVEKIT_JWT_BIND=:8081 sets what port the JWT (JSON Web Token) service binds to within the container, and shoud match with the number on the right side of the colon in your
ports:section for the container. - LIVEKIT_URL defines the URL used for public connections through the livekit client- this should be separate from the one created for your matrix homeserver, but can be a subdomain. So you could have matrix.example.com and livekit.example.com as your two.
- LIVEKIT_FULL_ACCESS_HOMESERVERS - this should match your
server_namevariable in thecontinuwuity.tomlfile, which is addressed further down, in the "Configuration" section. - LIVEKIT_KEY and LIVEKIT_SECRET - These should be secure, randomly generated keys. Per the continuwuity documentation, the LIVEKIT_KEY variable should be roughly 20 characters long, and the LIVEKIT_SECRET variable should be roughly 64 characters long. These can be generated however you like, but livekit includes a tool to generate them for you. Even if it isn't finished, save your docker-compose.yml. When in the same directory as the compose, run
docker-compose pull livekitto grab the livekit image. Then, rundocker run --rm livekit/livekit-server:latest generate-keys, and your console will return a pair of randomly generated keys of the correct size that you can input.
For the ports, you can set the number left of the colon to be whatever you'd like if that port is in use for you already, but for simplicity's sake if you can I'd leave it default.
As for the livekit container, the only thing that needs to be changed in the majority of instances is deciding the path to set for the location of livekit.yaml, more configuration will come for this later when we dig into the config files.
Outside of this, it is worth commenting on network_mode: host. This sets livekit to operate on the host machine's network, and livekit will bind to the relevant ports automatically. If you would rather remap the ports yourself or network things differently, remove network_mode: host and append this section to the livekit service in the compose:
    ports:
      - "127.0.0.1:7880:7880/tcp"
      - "7881:7881/tcp"
      - "50100-50200:50100-50200/udp"
Just make sure that later on, when we are handling networking, that you remember to change out the default ports I refer to for the ones you chose.
Configuration
continuwuity.toml
In whatever directory you specified in the docker compose earlier, create a text file named continuwuity.toml, then copy in the contents of the example config file found here. The linked reference is a comprehensive list of the different config options so I will only be addressing variables necessary to our base install. After copying it all in, navigate to the top of the file to the section labelled [global].
Note: when copying directly from the config file reference, all variables are commented out. Any that you wish to set to non-defaults must also be uncommented, not just filled in.
[global]
- server_name - Unless otherwise specified later in the config, the
server_namevariable will be used for all user-facing generated links. If you are using a subdomain for your homeserver, for examplematrix.example.combut would rather your server's users becenotaph@example.comrather thancenotaph@matrix.example.comthen you should set theserver_namevalue to theexample.comversion of the domain. You must also set your server's [global.well_known] values later on in the config. - address - because this guide is using docker, this must be set to
address = ["0.0.0.0"] - port - should be left alone, if you want to change the port used on your bare metal system then change the port mapping in your docker compose.
- database_path - needs to be set to
"/var/lib/continuwuity"(quotes included). Example:database_path = "/var/lib/continuwuity" - new_user_displayname_suffix - sets the suffix appended by default to every new user registration on your homeserver. By default continuwuity sets this to the trans pride flag emoji, if you wish for new users to have another suffix added on registration (that they can modify or remove themselves in their display name settings later) then set this value to the desired suffix.
- ip_lookup_strategy - default assumes your server is capable of both IPv4 and IPv6. If your server does not have IPv6 set up, then set this to
1to enable only IPv4 traffic, potentially increasing performance by not wasting time on IPv6 that won't connect. - allow_registration - if set to
false, no users will be able to register on the server after the initial admin user is created. If set to true, restrictions on registration can be set up in variables addressed later on. - suspend_on_register - if set to
true, newly created users will be "suspended" until released by an admin through a command in the admin room. Suspended users are still able to read messages, make profile updates, leave rooms, and deactivate their account, however cannot send messages, invites, or create/join or otherwise modify rooms. They are effectively read-only. If this is enabled, make sure to have a room set to "public" on your auto-join list containing info telling people what's going on. - yes_i_am_very_very_sure_i_want_an_open_registration_server_prone_to_abuse - alongside
allow_registration, this variable must also betrueif you have not enabled any kind of restrictions on registration. Otherwise, registration will not be enabled even ifallow_registrationis set totrue. - registration_token - if this value is set, new users will be required to provide this token to complete registration when making an account on your homeserver. While this can be changed by editing the config, this is generally a static string. If you want to have this token change on a regular basis, it is probably easier to do that with the
registration_token_filevariable. - registration_token_file - points to a file that contains the registration token. As of right now, this is only read by continuwuity once, at startup. Could theoretically be used to automate regular token changes if paired with regular restarts. It should be noted that tokens can also be created on an as-needed basis using commands in the admin room.
- registration_terms - allows you to set a "Registration Agreement" that must be accepted to register on the homeserver.
- require_auth_for_profile_requests - optional, but if set to
truerequires authentication from any homeserver to request info about profiles on your server, which can help reduce data scraping. - auto_join_rooms - where you would enter the room ID of a public room for new users to auto join, server must be started and rooms created within Matrix. Room IDs can be listed from the admin room.
- emergency_password - a recovery password that can be set to allow access to the server's bot account in order to regain access to the admin room or recreate an admin user account.
[global.well_known]
In this section you are setting up what URL your server tells other servers to connect to when requests are sent.
- client - this is the URL that your well-known file will give to clients connecting to the server. It should be a valid https address, no port involved. Example:
https://matrix.example.com - server - This is the URL that will be given over to servers you are federating with. It should just be the base domain of the URL you are using for the server, usually suffixed with the port for your reverse proxy. Example:
matrix.example.com:443
You will also want to make sure you set at least one of the following, if theither is specified all of the server's admins will be listed as support contacts.
- support_email - should be a valid email address that can be used as a support contact for your server
- support_mxid - the matrix ID of the user who should be contacted for support for your server. Example:
@admin:matrix.example.com
[global.matrix_rtc]
Here is where you'll need to do some setup for livekit to work. Add the following under the [global.matrix_rtc] heading:
foci = [
    { type = "livekit", livekit_service_url = "https://livekit.example.com" },
]
With the URL pointing towards the livekit service URL defined earlier.
livekit.yaml
Your livekit.yaml file (placed wherever you mapped it to in the docker compose eariler) should look something like this:
port: 7880
bind_addresses:
  - ""
rtc:
  tcp_port: 7881
  port_range_start: 50100
  port_range_end: 50200
  use_external_ip: true
  enable_loopback_candidate: false
keys:
  YOUR_MATRIX_KEY: YOUR_MATRIX_SECRET
Everything here basically does what it says on the tin. The port at the top should be the one you bound livekit to in the docker-compose.yaml earlier. For the RTC ports, only modify these if you modified the ports available to the livekit container in the docker compose file.
Be sure to replace YOUR_MATRIX_KEY with the value you set for the LIVEKIT_KEY environment variable back in the compose for jwt-livekit-service, and YOUR_MATRIX_SECRET with the value set for LIVEKIT_SECRET in the same place.
Networking
Here is where many setups will differ, mostly based on how you have your reverse proxy set up. First, to reiterate what was said in the prerequisites section:
Make sure you have ports 443 and 8448 opened in your firewall, the former for traffic between clients and the server and the latter for federation traffic between your server and other Matrix instances. If also hosting voice with livekit, you'll need to also allow 7881/tcp and 50100:50200/udp. If you changed any of these ports in earlier steps, don't forget to also change what you allow through your firewall to match.
Configurations for different local reverse proxies can be found here for the matrix-specific changes and here for the livekit-specific changes. If you're using Pangolin like I am though there is no need for any additional changes to the docker compose, a few rules just need to be made in the Pangolin configuration.
- Create a new public resource using the subdomain specified earlier as our matrix server URL, in my example case
matrix.example.com. Have it point at our matrix port as defined in the docker-compose. In our example:127.0.0.1:8008 - Create another new public resource, this time using the subdomain you've chosen for livekit. Example
livekit.example.com. This one is a bit trickier, as it requires some path-based routing. Thankfully this was added to Pangolin a few versions ago, so all you need to do is enable "advanced mode" when setting your proxy targets.- The base domain without any path should be pointing to your TCP port for the livekit server. In the example case,
127.0.0.1:7880. - Add a second target, this time hitting the
+ Match Pathbutton to the left to make this target only apply with specific URL paths. For this path, enter/sfu/getand for the actual target set it to127.0.0.1:8081. - Add two more targets, with the paths
/healthzand/get_token. Each of these should point to127.0.0.1:8081as well.
- The base domain without any path should be pointing to your TCP port for the livekit server. In the example case,
DNS
Back in the docker compose, we had you mount a continuwuity-resolv.conf file into the continuwuity container. This is because the default docker DNS resolver is painfully non-performant, and when federating your server is going to be making a lot of DNS requests. If you just don't care and you want to get your server up and running, use this as your continuwuity-resolv.conf
nameserver 1.0.0.1
nameserver 1.1.1.1
This points your DNS at cloudflare. Not ideal necessarily for privacy but will get you up and running. You can otherwise set up a local DNS resolver using Unbound or otherwise use the DNS server of your choice. Just be sure to set it to something other than the default docker resolver, as this will slow things down considerably.
First run setup
After all that setup, we're ready to initialize the server. Start it up using either docker compose up -d or through the GUI stack manager of your choice.
After all containers have finished starting, you need to check the logs for your main matrix container. In the case of this guide, you'd use docker-compose logs homeserver 2>&1
You'll get something along the lines of:
In order to use your new homeserver, you need to create its
first user account.
Open your Matrix client of choice and register an account
on example.com using registration token asd7fhf3h1ka.
Pick your own username and password!
With that token, you'll be able to register for your first admin account from the matrix client of your choice.
NOTE: Synapse-backed matrix servers, as well as the ElementX mobile client, have begun moving their authentication off of the server into another service called Matrix Authentication Service (or MAS), which does all authentication through OIDC. As a result, the Element X mobile clients have had the ability to register through non-OIDC means removed from them.
The "conduit" family of server backends does not use the MAS, so accounts will be registerable from many clients (I recommend the Element desktop client) but they will not be able to register with ElementX. You can, however, still sign in and use the livekit-enabled calls on ElementX (as not all apps have livekit integration yet), it just needs to be after you've registered.
After you've registered and signed in, your initial user will automatically be added to the "admin" room. This is a private room accessible only to admins of the homeserver and allows for the execution of admin commands with the !admin command. Admin command reference viewable in the continuwuity docs here.
Testing Connectivity
Because of all the path-based shenanigans required to run the matrix server, it is worth checking to see that your server is properly federating with others. My personal favourite tool for testing (because it also tests the connectability of MatrixRTC and your well_known endpoint) is the Matrix Connectivity Tester.
If everything is connecting properly, your output on the page should look something like this:
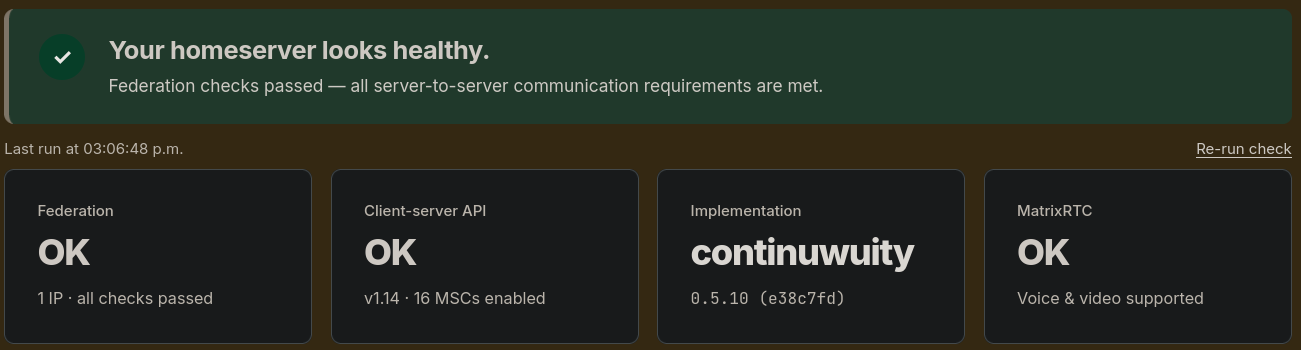
This shows that your server is federating with other servers, allowing users from other homeservers to connect to yours and vice versa. It will also show if your MatrixRTC is connecting properly, which is that livekit backend allowing for high quality audio/video calls.
As a reminder, you can issue individual sign-up tokens to people through commands in the admin room, but can also set it by changing the config file. The server must be fully restarting for the change to take effect.
For clients, I recommend for now either Element Desktop or ElementX, you just need to sign up using a different app if ElementX is what you are using. Some other clients that are options do not yet support MatrixRTC, so they will error when attempting to connect to a call.
Now, all that's left is for you to convince some of your friends to sign up and try out a call! I've been quite pleased with how much better this backend is than the previous options Matrix has tried, and I really look forward to seeing how it improves considering it was only added in earlier this year.
If you have questions, I'll help you the best I can. You can message me in my signal chat.